How to Add a New Gadget Holder Section in Blogger Templates
Hey, guys! Long time no see, right? I have been helping some friends to learn the entire blogging process and while setting up their blog, I found some new requests. One of my friends wanted to add a new gadget holder.
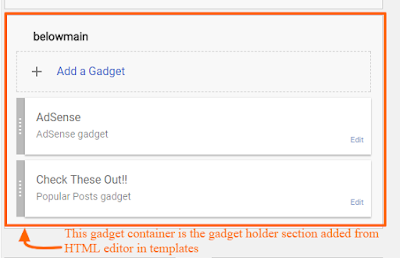
For those of you who don't know what a gadget holder is, let me tell you, gadget holders are the boxes you see when you edit your layout by adding and rearranging gadgets. When you want to add a new gadget, you click the + Add a Gadget button. These buttons are located in boxes. Those boxes also hold the gadgets, thus, they are the gadget holders. Simple as that, look at the image below if you are not clear about it yet.
3. Next, between the brackets, add CSS scripting to beautify your widgets.
4. Save your template.
That is all there is to it. I hope you enjoyed and found use of this tutorial, stay tuned for the next one.
For those of you who don't know what a gadget holder is, let me tell you, gadget holders are the boxes you see when you edit your layout by adding and rearranging gadgets. When you want to add a new gadget, you click the + Add a Gadget button. These buttons are located in boxes. Those boxes also hold the gadgets, thus, they are the gadget holders. Simple as that, look at the image below if you are not clear about it yet.
If you are using a basic blogger template or a third-party template, then you will have the basic header, post body, sidebar and footer sections to place such widgets.But, if you want to design a new blogger blog template or edit an existing one, you will need such holders to place gadgets at different locations wherever you want to add them. Like, above/below the footer section, under the header, below the main post body section, above the sidebar or even on specific pages!
How Different Gadget Holders Help!
There are many different gadget holders and it is preferred to have multiple such holders because of a few reasons which you should also get to know about-
- You can give different designs for elements like the headings of labels, background, etc. with CSS scripts for each different holder.
- different holders can be positioned at different places to even give extra spaces between other sections.
- Distributing widgets into different sections allows the entire blog's template to look better regarding organization and neatness.
How To Add A New Holder
It is very easy to add a new gadget holder. I will show you how to add one to your desired location and also how to customize it from the CSS and HTML editor to be able to give unique designs to all gadgets in the new and old gadget holder.
Steps to add a gadget holder-
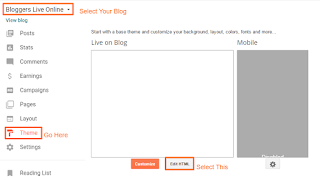
1. Go to Blogger Dashboard > Template > HTML editor. You might want to back up your template.
2. Choose where you want to add the gadget holder. For example, I wanted to add the holder below my main-body section (where the posts are viewed).
3. After deciding where you want to add the gadget, copy this code and paste it wherever you want to.
4. Save the template.
5. Go to the layout page to check if it has been placed correctly. Now you can easily add and arrange different gadgets in this section.
How to Customize the Holder's CSS to Beautify the Widgets
1. First of all, go back to the template HTML Editor.
2. Next, add this piece of script anywhere before ]]>
Steps to add a gadget holder-
1. Go to Blogger Dashboard > Template > HTML editor. You might want to back up your template.
2. Choose where you want to add the gadget holder. For example, I wanted to add the holder below my main-body section (where the posts are viewed).
3. After deciding where you want to add the gadget, copy this code and paste it wherever you want to.
You can change the name of the class and id to whatever you like.
4. Save the template.
5. Go to the layout page to check if it has been placed correctly. Now you can easily add and arrange different gadgets in this section.
How to Customize the Holder's CSS to Beautify the Widgets
1. First of all, go back to the template HTML Editor.
2. Next, add this piece of script anywhere before ]]>
#NewContainer {}You can change the name after the '#' in orange to the same name you used for the last procedure.
3. Next, between the brackets, add CSS scripting to beautify your widgets.
4. Save your template.
That is all there is to it. I hope you enjoyed and found use of this tutorial, stay tuned for the next one.


Thanks you sir. My site - Newsalizer
ReplyDeleteI was using the coad on my blog at www.mkamruzzaman.com Need help! You can visit my posts.
ReplyDeleteGreat Sir.
ReplyDeletehttps://technicalsquard.blogspot.com/2018/12/Ahreafs-Semrush-alternative-free.html
U have blogspot.com....are u getting enough traffic to earn money....because i heard google will not give approval to blogspot.com
ReplyDeletePerfect blog and information keep me updated with such wonderful content
ReplyDeleteBuy Gadgets Online