How to Add a Star Rating widget to Blogger

If you are a blogger providing content, tips, tutorials, recipes, reviews or anything at all to attract viewers, then you also should require for there to be a medium through which they can interact in a way that is a bit unique. But, for interaction purposes, you must all have comment forms and contact forms, buttons and things if such sort, but they are all very common. To add that bit or sparkle to your site, you need something like a star rating widget. Now luckily, we have provided a few methods using which you can add some of those sparkling stars to your own lovely site.
Since a site or a blog should most positively have a rating option. This widget improves the level of interactivity in your site and is highly recommended.
There are a couple of rating widgets for a blogger for free. 5-Star Ratings, Thumbs Up-Down Ratings, Yes-No Ratings, 1-5 Ratings, 1-10 ratings, etc.
Now, when it comes to the Blogger platform Blogger doesn't provide any rating widgets. There are a few gadgets provided by third parties, but they aren't good enough. If we want to add rating widgets to specific areas only, we cannot use them and have to use things like the widgets that are available on the web. In some cases, you can add provided widgets, which is recommended because it is much easier, and on the other hand you can also use HTML and CSS or Jquery or Javascript for this as well.
Part 1 - Adding a Rating Widget With Graddit
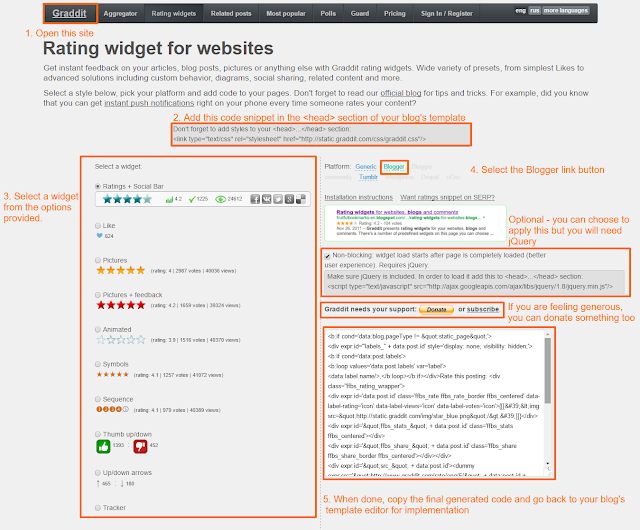
Graddit provides nice, compact rating widgets for free. I have already added them before, as you might have seen below all of my posts at the starting time of my blog. There had been no issues for me but I decided to remove them because it did not suit with my template. So I can safely recommend Graddit. There are plenty of choices to choose from and no registration required. It also has a very easy implementation process, and best of all, it's completely FREE!
Not only does Graddit offer rating systems, there are also polls, related posts, popular posts, and a few other widgets to choose from, that too at no costs.
There is also some feature offered by Graddit which allows the ratings to appear when your site's result appears on Google's search engine, which can drastically improve you SEO, but there is a special setting for this which can only be done by the service itself which requires you to add one of the email addresses as an administrator on you site, well, you can get more information about this through this link - Want Rating Snippet on SERP?

So, head over to their site right now and if you see any rating system you like, then without waiting anymore, you should follow the given steps to get this task done:
1. First of all, log into your blogger account and open the blog you want to edit.
2. Now go to the Template Editor and click on the Edit HTML button visible just below the preview of your site.

3. When the page loads, between the <head>...</head> section, add the following code just above it:
type="text/css" rel="stylesheet" href="http://static.graddit.com/css/graddit.css"/>
4. Now head over to graddit.com and select a rating widget first
5. On the right side of the page, click the "Blogger" link on the top to get the widget code. Optionally, you may also opt-in the jQuery functionality for animation effects. Copy the generated code.

6. Now, again come to the HTML of your Blogger template and look for the below code-
id='post' var='post'>
7. After finding the above line, paste the star rating code just above (if you want rating widget to appear at the top of post content) or below (if you want it below the post) it.
8. Save the changes and you have successfully added the rating system.
If you Sign up on this site, you will get more features. But, if you feel the need to try out a few more styles then go ahead or even if you want a different service provider instead, the continue reading because I still have a few more methods up my sleeve!
Part 2 - Adding A Rating System With RatingWidget
If you want a sleeker look for your rating widget, with more professional styles and a bit more freedom to the design, then you can use Rating-widget.com for exactly these purposes. Now, this system is completely free, but if you want extra features like analytics and a dashboard and everything if you are really serious about knowing your ratings, then you need to upgrade using plans that are based on monthly (starting from $3.99) and annual recharges (starting from $4.99) or you can even buy the lifetime package (starting from $149.99).
Well, now let me tell you how you can add these widgets. This will be no harder than it was in part 1 of this post.
1. First, go to rating-widget.com and click the Get my Free Widget button.

2. Now, when the page loads, before doing anything at all, you need to on the Blogger button.

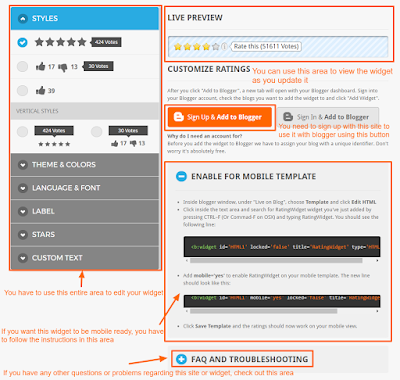
3. When you click on the Blogger button, you will see something like the page in the image below this step. There would be an orange button - Sign Up & Add To Blogger. You need to click this in order for the widget to work. This would let you create a free account
Note - If you want extra features, then you would need to upgrade. After creating you account, on the top of the page, a button labeled Analytics woud be visible. You should go check it all out.

4. After signing up, you would need to edit your widget's style, format, colors, language, labels, and text if you don't already like you widget. You can do this from the left side of the page.
5. You can check on how your widget look while you are editing it from the preview section on the top right section of the page.
6. If you want the widget to be viewed on phones too, then you need to expand the Enable For Mobile View section and follow the instructions given by them.
7. When you are done with the editing, you can click the Add to Blogger button, but then the widget would be added as a widget which would not be included in the post. That is why, instead, you should copy the Source Code.
8. Now, come to the HTML of your Blogger template and look for the code below -
id='post' var='post'>
9. Paste the code just below this code and click Save. Now you can view your blog's post and you should see the widget.
Another great thing about this site is that it works not only on Blogger, but also on other services like WordPress, Wix, and even if you are signed up with AddThis, you can use it with that. Another option is to do it directly with Javascript.
Part 3 - Adding a Rating Widget with Widget Engine
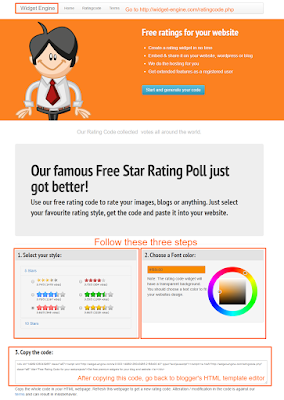
Widget Engine is another pretty awesome star rating widget engine. The great thing about this site is that it has a straight forward system. You can easily create the widget in 3 steps and then do the pasting of the code in blogger as you wish.
1. Go to Widget Engine's Star Rating System Generator page.
2. Scroll down to the point when you see the Generator Section. There, you can see the instructions that are clearly visible in 3 steps.
 3. As the first step in the generator, you have to decide whether you want 5 stars or 10 stars. And in both counts, choose your favorite style.
4. In the second step of the generator, you have to choose the color of the font used with the widget which is recommended to match the main color theme of your website. Remember, this is the color of the font, not the widget itself.
5. Last but not the least, you will have your generated code. You will need to copy it and do not alter it because it is very likely not to work afterward.
6. Now, come to the HTML of your Blogger template and look for the code below -
id='post' var='post'>
7. Paste the code just below this code and click Save. Now you can view your blog's post and you should see the widget.
And now you are done! I have personally tested all of these widgets and did extensive research out of multiple services to give you which I think are the top 3. There are also much more out there and that is exactly why you should comment down below if you have any other query or request. Well, I hope you liked one of these rating systems and if you did, I also hope that it worked out well for your site. Come back soon and check for more updates.
1. Go to Widget Engine's Star Rating System Generator page.
2. Scroll down to the point when you see the Generator Section. There, you can see the instructions that are clearly visible in 3 steps.
 3. As the first step in the generator, you have to decide whether you want 5 stars or 10 stars. And in both counts, choose your favorite style.
4. In the second step of the generator, you have to choose the color of the font used with the widget which is recommended to match the main color theme of your website. Remember, this is the color of the font, not the widget itself.
5. Last but not the least, you will have your generated code. You will need to copy it and do not alter it because it is very likely not to work afterward.
6. Now, come to the HTML of your Blogger template and look for the code below -
id='post' var='post'>
7. Paste the code just below this code and click Save. Now you can view your blog's post and you should see the widget.
And now you are done! I have personally tested all of these widgets and did extensive research out of multiple services to give you which I think are the top 3. There are also much more out there and that is exactly why you should comment down below if you have any other query or request. Well, I hope you liked one of these rating systems and if you did, I also hope that it worked out well for your site. Come back soon and check for more updates.


I really found this post useful, I also used the Graddit option and I also want to recommend this to every blogger
ReplyDeleteThis comment has been removed by the author.
ReplyDeletethanks for sharing
ReplyDeleteVery helpful post...!
ReplyDeletethanks for valueable information
ReplyDeleteThnks www.jonakaxom.ooo
ReplyDeleteThanks for sharing such a knowledgeable post. I have been reading your previous valuable posts.
ReplyDeleteStar Rating Plugin WordPress
Nice article thanks for sharing
ReplyDeleteCan you be more clear please ?
ReplyDeleteShould i put the script above the head , or above the /head ?
Thank you !
Thanks!
ReplyDeleteCyfrus